ORDS : AutoREST Enabling Objects
AutoREST is a feature in ORDS that allows us to interact
with oracle database without writing any code. It provides predefined REST handlers
(GET, POST, PUT, DELETE) to access a database object.
Handlers are nothing but the set of action that needs to be
performed when a particular REST operation is called on a resource. For
example, if we call a REST web service with GET method, ORDS needs to know what
action it is supposed to perform on the resource with GET method. This action
is defined with the help of handlers.
At very high level, meaning of each REST method can be
defined as (though it can vary depending on the resource) –
1. GET - Retrieve
records with or without search criteria
2. POST - Insert new
record
3. PUT - Update
existing record
4. DELETE - Delete
existing record
Let’s start AutoREST enabling a database table. But before
that I am assuming below things –
- You have access to oracle database.
- You have ORDS installed on oracle database.
For
this demonstration, I am using SQL Developer and I have installed ORDS on
Oracle XE Database installed on my local machine (i.e. localhost).
Step 1 : REST enable a database schema.
When ORDS is installed on database, it enables a ‘REST Data
Services’ menu option in connection tree as shown below. Expand this menu


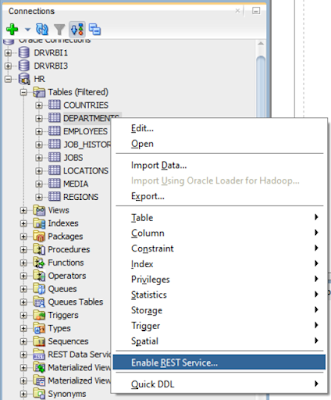
Under the connection tree, right click on schema name,
select REST Services -> Enable REST Services option.


Mark the Enable schema checkbox. Give alias to your database
schema if you don’t want to reveal the schema name otherwise keep it same as
schema name. Click on Next.


Click on Finish.


Step 2 : REST enable database table.
Right click on a table name that you want to REST enable and
select Enable REST Services.

Make
sure the Enable object checkbox is marked. Give object alias. This will be part
of a URI that we will be using to access DEPARTMENTS table. Click on Next.


Click on Finish.


We can also perform above two steps using APIs provided by
ORDS as shown below –
Step 1 : REST
enable a schema
BEGIN
ORDS.ENABLE_SCHEMA(p_enabled
=> TRUE,
p_schema => 'HR',
p_url_mapping_type => 'BASE_PATH',
p_url_mapping_pattern => 'hr',
p_auto_rest_auth => FALSE);
commit;
END;
Step 2 : REST
enable a database table
BEGIN
ORDS.ENABLE_OBJECT(p_enabled => TRUE,
p_schema => 'HR',
p_object => 'DEPARTMENTS',
p_object_type => 'TABLE',
p_object_alias => 'departments',
p_auto_rest_auth => FALSE);
commit;
END;
That’s it. We have REST enabled a table DEPARTMENTS. Now
let’s try accessing it from REST client. Here we will be using Postman – addon
by google chrome which acts as a REST client. A simple web browser like Mozilla
Firefox also works as a REST client but it has limitation of being able to call
only GET methods.
1) GET :- We call GET method on departments table
(which is REST enabled) with URI below - http://localhost:9090/ords/hr/departments/
It tells the ORDS installed on database
running at localhost:9090 to connect to the ‘hr’ schema to query the
‘departments’ table. Below is the output in JSON format we get in browser -

We can also query single record by just appending a
primary key column value to the URI (as the one returned in above output as
href link). It also includes additional links to capture metadata information.


2) POST :- We can insert new record in departments table with POST method. For this, we will use Postman. URI will remain same as the one in GET method. o Here we need to select POST method and give input values to the columns in departments table as key:value pair in body section.
- Here we need to select POST method and give input values to the columns in departments table as key:value pair in body section.
- Then Click on send. We will get 201 response code which means record is created successfully.

3) PUT :- We can update an existing record with
PUT method. Follow the below steps –
- Select PUT method.
- URI will remain same here as well except one change that we need to give the primary key id of the record that we want to update in the URI itself.
- Specify the values for fields that we intend to update as key:value pair in the body section.
- Click on send. We will get response code 200 which means the operation is performed successfully.

4) DELETE :- We can delete an existing record using DELETE method with below steps -
- Select DELETE method.
- Here URI will have search criteria (query) included in it as shown below (Here I’ve want to delete the department with department_id 300)
- Keep the Content-Type header attribute value as application/x-www-form-urlencoded

very useful content
ReplyDelete